I have included written instructions with images as well as a video so you can teach this project to your kids in different ways.
Materials
- a piece of computer paper (8.5" x 11")
Folding
Do this project in full (story and folding) in front of your kids before teaching them these folding instructions. It will help them understand what the final product is supposed to be.
- Have your kids do the origami-folding portion of this project a few times before trying it with the storytelling. They will need to know the folding steps by heart to perform this project well.
- These folding steps don't have to be precise and to an exact measurement.You'll see from my video that everything still works great even if the folding isn't perfect.
- Have your kids fold their piece of paper in half by bringing the top down to the bottom. Have them crease their folded edge.

- Tell your kids to rotate the folded edge so that it is away from their body (folded edge at the top).
- Next, have them bring the top right corner down to the middle of the page. Then, have them do the same for the left corner.

- Now, they will fold up the top layer of the bottom of the page so that it overlaps the bottoms of the folded edges. Tell them to turn it over and do the same for the other side.

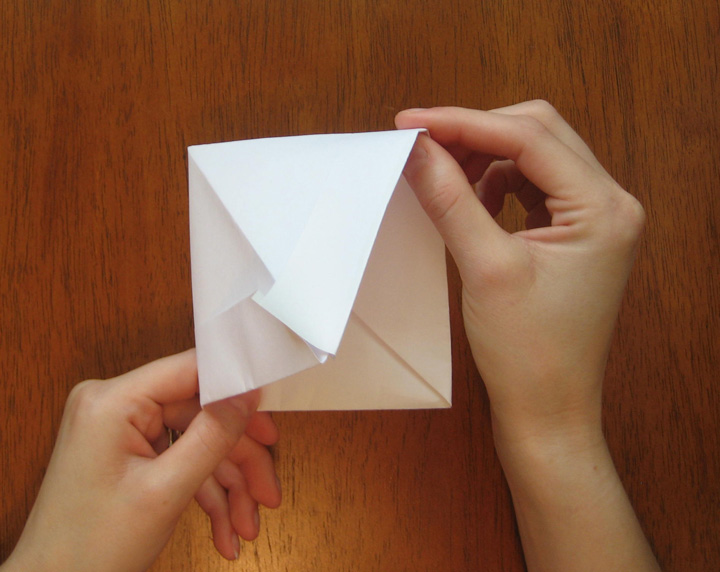
- Now they can open it - this should look like your normal paper hat. This is Stage 1 (you will know what Stage 1 means when we combine the story with the folding steps).
- In the open position from Step 7, have your kids pull the front and backside of the hat so that it begins to fold the other way.

- Have them crease the hat in this new folded position.
- Tell them to take the bottom tip of the top layer and fold it up to the top point.

- Now have your kids open it. This is Stage 2. It should look like a fireman's hat from the side.

- Have your kids put the front of the fireman's hat face down.
- Tell them to fold up the remaining layer up to the top point, just like in Step 10.

- When your kids open it, it should resemble an admiral's hat. This is Stage 3.
- Have your kids fold the open admiral's hat just like in Step 8.
- At this point, the top sides of the folded piece are not attached to the top. Tell them to take both the right and left sides and slowly pull them away from the top.
 They will need to pull a little hard so that it full expands. (This is the part that really gets the ooos and awwws during the performance!)
 - Have your kids crease the bottom of the newly opened piece. It should resemble a boat. This is Stage 4.

- Now, have your kids tear off the left corner (about an inch or so) of the boat. This is Stage 5.
- The, tell them to do the same for the right corner. This is Stage 6.
- Next, they will tear off the top of the middle section of the boat. This is Stage 7.
- Finally, they will open the piece carefully by unfolding the paper, but leaving the main centerfold from Step 3 intact. The paper should now look like a t-shirt. This is Stage 8.


Your kids will be conducting the folding exercise throughout the story. The idea is to never halt the story, but rather keep it flowing while folding the individual stages. Try to teach your kids to slow down their folding if the story is going longer, or slow down the story if their folding is taking a little while. They will learn to have their folding stages ready at certain points in the story. The story below is in quotations, and the instructions are in italics.
- Your kids will begin folding to Stage 1. Their folded Stage 1 hat should be ready by the time they come to the end of this step. "Once upon a time, there was a boy who loved playing outside. One day, he wanted to go play, but it kept raining and raining. He asked his mom, 'Mom, can I go play outside?' She told him, 'Only if you have a hat so your head doesn't get wet.' So, the little boy went to his bedroom and began making a hat to wear. When he was done, he went to his mom and said, 'Look, Mom! I now have a hat to wear outside in the rain!'" Your kids will now open the Stage 1 hat as in Step 7.
- Your kids will begin folding to Stage 2. "His mom said, 'Okay, have fun!' So the boy was playing outside in the rain, splashing through puddles, and having a great time. All the sudden, he heard sirens, and he saw a fire truck drive by his street. He said, 'I can't be a fireman with this kind of a hat. I need a fireman's hat!'" Your kids will open the Stage 2 hat as in Step 11.
- Your kids will now begin folding to Stage 3. "So, the boy wore his fireman's hat and pretended he was helping the fireman put out the fire. A little while later, it began to rain really hard, and it started to flood. The boy realized, 'I need a boat, but I can't be an admiral of a boat with this fireman's hat. I need an admiral's hat!'" Your kids will open the Stage 3 hat as in Step 14.
- Your kids will begin folding to Stage 4. "Once the boy became an admiral, he realized, 'I can't be an admiral without a boat!'" Your kids will open the Stage 4 boat as in Step 17.
- Your kids will tear each corner of the boat off at certain points in the story below.
- "So, the boy began steering his boat. But all the sudden, he ran into a tree and tore a hole in the side of his boat!" Your kids will tear the left corner of the boat for Stage 5 as in Step 18.
- "The boy's boat was still good enough to float, so he continued along his journey. He turned a corner, and oh no! He ran into another tree and tore a hole into the other side of his boat!" Your kids will tear the right corner of the boat for Stage 6 as in Step 19.
- "The boy's boat was still in good enough shape to float, so he kept moving along. Then, all the sudden, a big wave came up and turned his boat over and ripped a hole in the middle of his boat!" Your kids will tear the middle part of the boat for Stage 7 as in Step 20.
- "The boy's boat began to sink because of all the holes. But the boy said, 'I'm not worried because I have a life jacket!'" Your kids will unfold the boat for Stage 8 as in Step 21.
- One great aspect about this project is that your kids can make the story their own. They can name the boy (or girl), have the boat ran into a cow instead of a tree, or make the story a little more intriguing by adding more details to the story.
- Practice makes perfect! To really be successful at combining the story with the folding, your kids will want to practice this project again and again.
- Use props! Your kids can use a doll or stuffed animal for the boy (or girl), Lego pieces for houses, trees, or the fire truck! They can even act it out as a play.
- Activity Village has quite a few origami projects for kids. Videos too!
- Tammy Yee's blog is dedicated to origami for kids. You can print the designed paper she uses to make amazing origami (you'll need a color printer). Be sure to find origami projects that are appropriate for the ages of your kids.
- The Easy Origami for Kids blog has videos about making origami. Videos may help some of your kids who lean toward visual learning do well with this project.
- Artists Helping Children is a great resource for origami projects for kids, including fabric origami!


No comments:
Post a Comment